
Articles
Discussion Help
How to Insert
Images into Posts
Most members know how to Reply to a post, Start a New Topic, etc., and even how to do some formatting of their posts. The majority though seem to have problems when it comes to inserting an image into the post.
It's really not difficult. In the following sections, we take you through it step by step. Reading through, it's possible that you will think that it's complicated and daunting. It's not. In fact, it's very easy indeed, and the only reason that the following looks a bit complicated is that we are trying to cover all the possibilities.
Skim through it, spot the bits that you need, and give it a try.
After your second successful inclusion of images, you'll know as much as the rest of us, and you'll be wondering why you didn't try before
Type and Size of Images [Will become a live link]
These days, almost all output from digital cameras is in JPG files. These are the sort of files that we are going to consider. In this section, we tell you how to find out what the dimensions of your current pictures are, and discuss whether or not they need to be re-sized.
Automatic Re-sizing of Images [Will become a live link]
In most cases, the Discussion Board is now able to resize pictures from you "on the fly", and without any intervention by you.
Resizing by Software on Your Own Computer [Will become a live link]
If the pictures are too big for even our auto-resize software to handle, or if you want to resize them using software that you currently have on your computer, you are quite at liberty to do so yourself. We discuss this.
Our Download of a Resizing Utility [Will become a live link]
We can now offer Windows users the download of a very useful extension to Windows that will resize pictures on their own machine with just two clicks!
Inserting Your Image(s) [Will become a live link]
- and finally, the really easy bit - we tell you how to insert your picture(s) into a post.
Type and Size of Images
These days, almost all output from digital cameras is in JPG files. These are the sort of files that we are going to consider.
To find out how big your picture is, either open Windows Explorer, or click My Computer, and navigate to the folder that contains your picture.
Your "File Manager" will be set to display files in either List mode or Icon mode.
In either case, just hover the mouse over the icon for the file:-
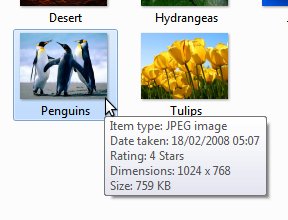
This is a screenshot of just part of the screen.
Hovering the mouse over the file icon causes the properties to be displayed. In particular, we see that for this example:
The file is a JPEG (JPG) type.
Width is 1024 pixels
Height is 768 pixels
Size of the file is 759k bytes
So what does that mean, is it good or bad, and what about it anyway?
Well, the first thing is that you now know how to look up picture dimensions and file sizes... but yes, that's a reasonably small picture.
1024 pixels (dots) in width is coincidentally the whole width of this page, including the menu strip. It's about twice the width that we want it to be for the Discussion Board. The Discussion Board has a maximum viewing area for attached pictures of 540 x 540 pixels.
Do we need to worry?
In that case, and similar, not at all.
As we shall see in the next section, we have recently added some rather clever code to the site to take care of the size of uploaded pictures, but as we shall also see, there is a limit to what it can do.
Just as a guide-line, anything up to 540 x 540 pixels is fine - just upload and insert it.
Anything greater than 540 x 540, and up to about 3264 x 2448 (That's the max. output of an 8 Megapixel camera) can be re-sized automatically by our site software as it is uploaded, but as the size increases, the upload takes longer - it could take minutes for each such picture.
Therefore, for larger files straight from your camera, you might like to consider using the resizing methods that we suggest in the following sections anyway.
Automatic Re-sizing of Images
In most cases, the Discussion Board is able to resize pictures from you "on the fly", and without any intervention by you.
The maximum size that can normally be displayed on the board is 540 x 540 pixels.
Anything smaller than that is simply displayed "as it is", with no intervention by the board software.
If an uploaded picture is larger than that, and won't fit into a 540 x 540 pixel "box", the software intervenes, and scales the picture so that it does fit into 540 x 540.
For example, uploading a 600 x 400 picture would cause the software to intervene, and re-size it to 540 x 360.
That situation is maintained all the way up to uploaded pictures of 3264 x 2448. That is, to the biggest possible output from an 8 Megapixel camera.
It is simply not possible for us to do an automatic re-size of pictures larger than that, and these are becoming increasingly common as we start to see 10 and 12 Megapixel cameras in the shops.
In any case, it is probably not desirable. As photos get larger, the time to upload them increases, using your bandwidth and also causing delay - a large picture can take several minutes to upload.
Better for larger pictures, and mandatory for those over 8 Megapixels, is to re-size the picture on your own computer before uploading it. There are several ways to do this, and we discuss them in the next two sections.
For the moment though, the message is this:-
- If your picture is small, just upload it, and we will attend to it.
- For larger pictures, up to 8 Megapixels, you might like to consider resizing them before uploading.
- Pictures above 8 Megapixels must be resized before uploading
See the previous section for how to find the size of your photos
See the following two sections to learn how to resize photos for yourself
Resizing by Software on Your Own Computer
If the pictures are too big for even our auto-resize software to handle, then you will need to do something about that - you will need to resize them one way or another.
Even if they can be handled by the resizing software, you may actually prefer to resize them yourself before uploading them anyway. This gives a far quicker upload.
There are two ways to do this.
In the next section, we describe to you a neat little Windows Extension that will resize for you in just two mouse-clicks! Here, we are just going to give you the gist of using a computer program to resize on your own machine.
Until we introduced the auto-resize code on the site, this was the only way to use large pictures on the Discussion Board. It's still the method-of-choice for the board administrators, and there are advantages to doing it this way, for example:-
Our Download of a Resizing Utility
We can now offer Windows users the download of a very useful extension to Windows that will resize pictures on their own machine with just two clicks!
Inserting Your Image(s)
Many members are happy to post on the Discussion Board, but relatively few try to insert pictures into their posts. We show you here, in very simple steps, how to do exactly that.
We must pre-suppose that:
- you have a picture somewhere on your computer
- that you know where (in what folder) that picture is
- and that you are already comfortable writing a post.
Once you've written your post, inserting the picture looks complicated, but in fact it's very easy. Here it is in steps, each step with a picture:-
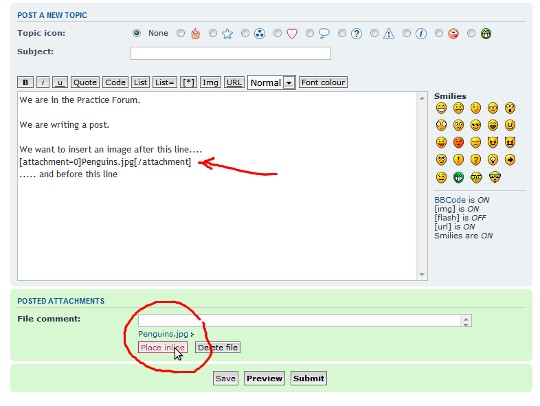
First, we write some text for the post.
The following screenshot will be familiar to anybody who has ever posted.
This example has four typed lines, and we are going to try to put a picture into the post between lines 3 and 4. Note that we've left a blank line ready for it....
Note also that, under the text entry box where we type, there are several tabs. The middle one of those tabs says Upload Attachment. Click it!

That brings up the Upload attachment dialogue, where we can select and upload our picture.
Just click Browse...
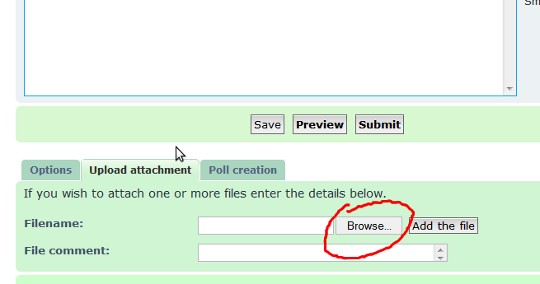
.......and you will be looking at a (smaller) window into your own computer's filing system.
In the shot below, we have already navigated to the picture that we want (1), and clicked on it (it's now highlighted), and we are about to click on the Open button (2)...

Once we click the Open button, that "window into our own computer" disappears, and we are back at the Upload attachment tab - but note that now the "address" of the picture that we want to upload is in the box next to the Browse button, so all is well....

As you would expect, we click that Add the file button, and our upload starts. It can take a few seconds or a few minutes, depending on the size, but when it's complete, the display will change to something like this.....

Now all that we have to do is to:-
- Click our mouse on the (blank) line where we want to insert the picture and
- Click that "Place inline" button.
What we will see is a line of text inserted into our post.....
... and if we click Preview, we have A Eureka Moment!
One word of warning though - now that you've done it, don't forget to click Submit to post it!

